Project Management
The Project management page is available to users with the Project manager or Administrator role and can be accessed
using the Project Management menu item in the sidebar.
Members
A project's test results, or listener API endpoints can only be accessed by users who are a member of that project. The Members tab allows project managers to configure who has access to the selected project.
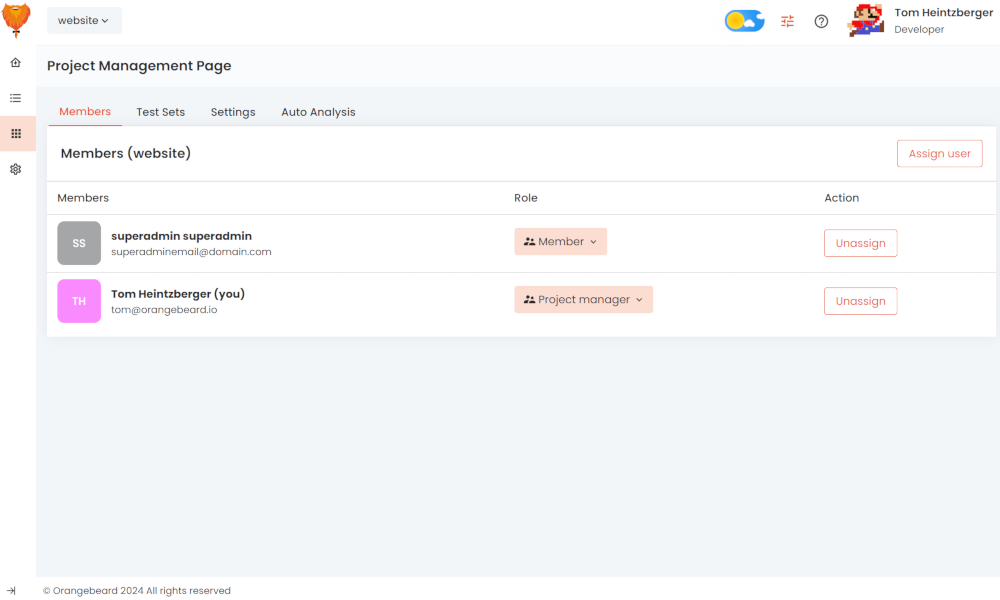
Assigning members
To assign a new user to the project, press the Assign user button in the top right. The user assignment modal window
will be displayed. This modal window has a search box to find users by name or e-mail address and shows a list of
matching users to select from.
When a user is selected, it can be assigned to the project using the Assign button.
When a user is assigned to a project, the user is granted member access by default.
Changing a member's role
To change a project member's role, click the Member's role. From the dropdown that appears, a member can be given the default Member role, or the Project manager role. The latter grants access to the project management page.
Unassigning members
To unassign a member from the projects, click the Unassign button in the Action column for the member you wish to unassign.
When there is no member with a Project manager role assigned to a project, only Administrators are able to manage the project settings, or assign a new project manager.
Test Sets
A Test set is registered for a project the first time a test run with a new test set name is reported. After that, every time a test run with the same name is reported, it will be considered a run of the same set. Within a test set, Orangebeard keeps track of test cases and -optionally- SUT components.
Test sets overview
On the test sets view, all test sets are displayed by their display name. When a test set is
selected, any reported SUT components for that test set are displayed in the Components column. Each component is
displayed with its version string and last updated date.
When a component is selected, the Test Cases column is filled with all test cases in the test set and all test cases
that are related to the selected component have their checkbox selected.
Selecting or deselecting tests for any given component will influence any Auto Test pilot advice for the selected test run when the selected component is marked or detected as updated.
Managing test cases
By clicking the Manage test cases button, the test case properties for the selected test run can be updated.
Every test case known to the selected test case will now be displayed with their full suite path and two properties that
can be enabled or disabled:
- Active: Test cases are active by default. Orangebeard can detect new test cases that are added to a test set, but as it is not always advised to run all tests, the removal of a test can not be determined from the reported test runs. Un-marking a test case's active property tells Orangebeard that the test case should no longer be expected (or advised).
- Always Run: When using the Auto Test Pilot for test run optimization, test cases are ordered by relevance for a specific change. There are however often test cases that should always be run, regardless of what has changed. The always run property tells Orangebeard to never advise against running the marked test cases.
Test set display names
Test sets are created using a unique name. Historically and for configuration readability, this registered name is the unique key under which a test set is known to Orangebeard. When a test set name change is desired, this can be done by Setting a display name for the test set. This display name is then used throughout the application, without the need to update any runner configuration. Test case history and defect analyses are historically retained this way.
To update test set names, click the Change Test Set Display Names button.
Settings
Test results page age limit
Setting this value to one of the predefined values will limit the test runs displayed on the
Test Runs page to runs that are not older than the configured value. This allows
for more focused searching in test runs.
This setting only affects the number of test runs that are displayed and has no effect on other functionality. The
default setting is Display everything.
Test result inactivity timeout
This timeout configures the maximum amount of time a test run can stay In progress without receiving any new results
or logs. Orangebeard will force-finish test runs that are inactive for a longer period than this configured setting.
Defect registration
Enabling defect registration allows to configure an API to be called from
the defect type modal window.
When a configuration is present, the modal window gets a button to report the defect to an external defect registration
system, such as JIRA, GitLab or Azure DevOps.
If the response contains a URL to the created issue, that URL will be stored with the issue for future reference.
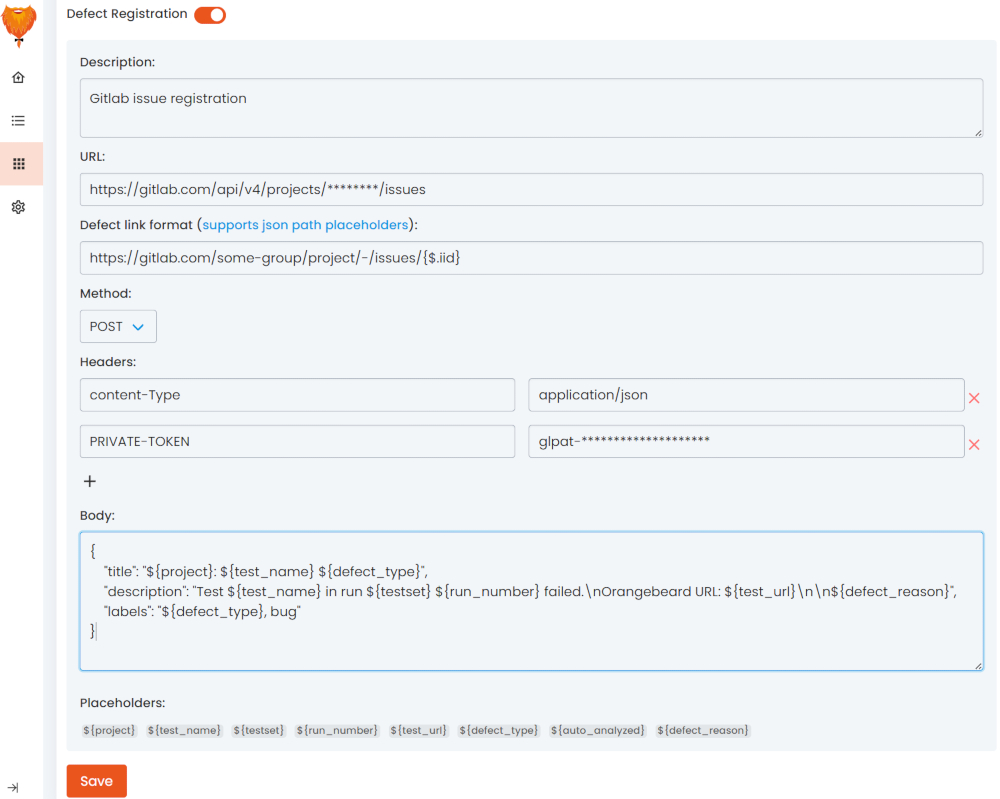
In the defect registration configuration form, the following information can be configured:
- Description: A description, used for your own reference.
- Server Sent Request: Configures the request to be sent from the Orangebeard application server, instead of directly
from the user's browser. External parties might not be reachable from the browser due to missing CORS support. - URL: The url to call when the defect registration is requested. This URL is expected to be a valid https URL.
- Defect link format: The URL to link to after registering with the external system. Supports 1 JsonPath placeholder that referenced a field in the response. Examples below.
- Method: The HTTP method to use.
- Headers: key-value pairs containing HTTP headers and their values. To add more headers, click the button.
- Body: The request body to send (in case of POST or PUT request) The body can contain the placeholders below.
Placeholders
To provide test specific information, placeholders for the following items are allowed in the URL and body:
| Placeholder | Value |
|---|---|
${project} | The project name |
${testset} | The test set name |
${test_name} | The test name |
${run_number} | The sequence number of this run |
${test_url} | The url of the test result in Orangebeard |
${defect_type} | The defect type |
${auto_analyzed} | A boolean value indicating if the defect type and reason are determined by auto analysis |
${short_description} / ${defect_reason} | The defect description |
${long_description} | Content of the 'Additional information' field |
${user_name} | The User name |
Defect registration configuration examples
- GitLab
- Jira
- Azure / TFS
- Server Sent Request: true/false
- URL:
https://gitlab.com/api/v4/projects/[Project ID]/issues - Defect Link Format:
https://gitlab.com/[Group]/[Project]/[Repository]/-/issues/{$.iid} - Method: POST
- Headers:
- Content-Type:
application/json - PRIVATE_TOKEN:
Gitlab token (glpat-*****)
- Content-Type:
- Body:
{
    "title": "${project}: ${test_name} -> ${defect_type}",
    "description": "Test ${test_name} in run ${testset} #${run_number} failed.  \n-...URL: ${test_url}  \n- short_description: ${short_description}  \n- defect_reason: ${defect_reason}\n- long_description: ${long_description} \n- AA: ${auto_analyzed}\n- user_name: ${user_name}",
    "labels": "${defect_type}, bug"
}
More information: GitLab > Issues API > New Issue
- Server Sent Request: true (Atlassian has no CORS header, so the UI can't send the call)
- URL:
https://[accountname].atlassian.net/rest/api/3/issue - Defect Link Format:
https://[accountname].atlassian.net/browse/{$.key} - Method: POST
- Headers:
- Content-Type:
application/json - Authorization:
Basic [Base64Encode(Username:ApiToken)]
- Content-Type:
- Body:
{
    "fields": {
        "summary": "${test_name} in ${testset} failed",
        "description": {
            "content": [
                {
                    "content": [
                        {
                            "text": "${long_description}",
                            "type": "text"
                        }
                    ],
                    "type": "paragraph"
                }
            ],
            "type": "doc",
            "version": 1
        },
        "issuetype": {
            "id": "[issuetype-id]"
        },
        "project": {
            "id": "[project-id]"
        }
    }
}
More information: The Jira Cloud platform REST API > Issues > Create Issue
- Server Sent Request: true/false
- URL (TFS):
https://{instance}/{collection}/{project}/_apis/wit/workitems/$task?api-version={api-version} - URL (AzDo):
https://dev.azure.com/{organization}/{project}/_apis/wit/workitems/$task?api-version={api-version} - Defect Link Format (AzDo):
https://dev.azure.com/{organization}/{project}/_workitems/edit/{$.id} - Method: POST
- Headers:
- Content-Type:
application/json-patch+json - Authorization:
Basic [Base64Encode(:{PersonalAccessToken})]
- Content-Type:
- Body:
[
    {
        "op": "add",
        "path": "/fields/System.Title",
        "value": "${test_name} in ${testset} failed"
    },
    {
        "op": "add",
        "path": "/fields/System.Description",
        "value": "${short_description}  \n${long_description}"
    },
    {
        "op": "add",
        "path": "/fields/Microsoft.VSTS.Common.Priority",
        "value": 2
    }
]
More information: Microsoft Learn > REST API > Work Items > Create
Defect link examples
- Direct URL from response
- Fixed URL with placeholder
Link format: {$.web_url}
Registration response:
{
    "id": 84,
    "iid": 14,
    "web_url": "https://gitlab.example.com/my-group/my-project/issues/14"
}
Result: https://gitlab.example.com/my-group/my-project/issues/14
Link format: http://gitlab.example.com/my-group/my-project/issues/{$.iid}
Registration response:
{
    "id": 84,
    "iid": 14
}
Result: http://gitlab.example.com/my-group/my-project/issues/14
Auto Analysis
The Auto Analyzer helps in the analysis of failed tests, by searching for earlier occurrences of the same, or similar failures and presenting these as a suggestion to the user.
Enabling / Disabling
Using the Enable Auto Analysis toggle, the auto analyzer functionality is enabled or disabled for the project. When the feature is disabled, no analysis suggestions will be done when a test run finishes. Users are still able to save defect analyses for any failed test.
Conservative mode
When Conservative mode is enabled, auto analysis will behave in a different way, to prevent test analyses to be
pre-filled in some cases. When this setting is enabled, a failed test is only automatically analyzed, if the previous
run of that same test has also failed.
If a result is found, classification is only saved if (and only if) the failure is the same failure as in the
previous run (the origin of the analysis is the previous run of the same test). Otherwise, the found result is omitted
and the issue status remains To investigate.
Examples:
| Run 1 | Run 2 | Analysis result | Ratio |
|---|---|---|---|
| Fail (reason x) | Fail (reason x) | Reason x | Keep AA result (continuing failure) |
| Pass | Fail (reason y) | None | No auto analysis (previous is passed) |
| Fail (reason x) | Fail (reason z) | To Investigate | Omit AA result (not equal to previous) |
First example: Run 1 of a given test has failed. A user has analyzed the defect and classified it with reason x. In the second run, the defect has not yet been fixed, so the same defect occurs. Because the previous run of the same test has failed, the auto analyzer will run. In this case it will find the analysis from the last run as the most relevant hit and therefore store the analysis.
Second example: Run 1 of a given test has passed. In the second run, the test fails. As the test case was passing before, no auto analysis will be performed in conservative mode.
Third example: Run 1 of a given test has failed. A user has analyzed the defect and classified it with reason x. In
the second run, the test fails again so the auto analyzer will try to determine if this is an ongoing failure. The
analysis however shows that this is a different failure (or the reason can not be determined). Because it is not an
ongoing defect, the analysis result will not be stored and the defect will remain in the To investigate category when
using conservative mode.
Webhooks
Webhooks let Orangebeard call a configured URL when a certain event is triggered. This allows communicating the announcement, start or finish of a test run to another system, like Slack or Teams.
Configuration
To add a new webhook, click the Add webhook button.
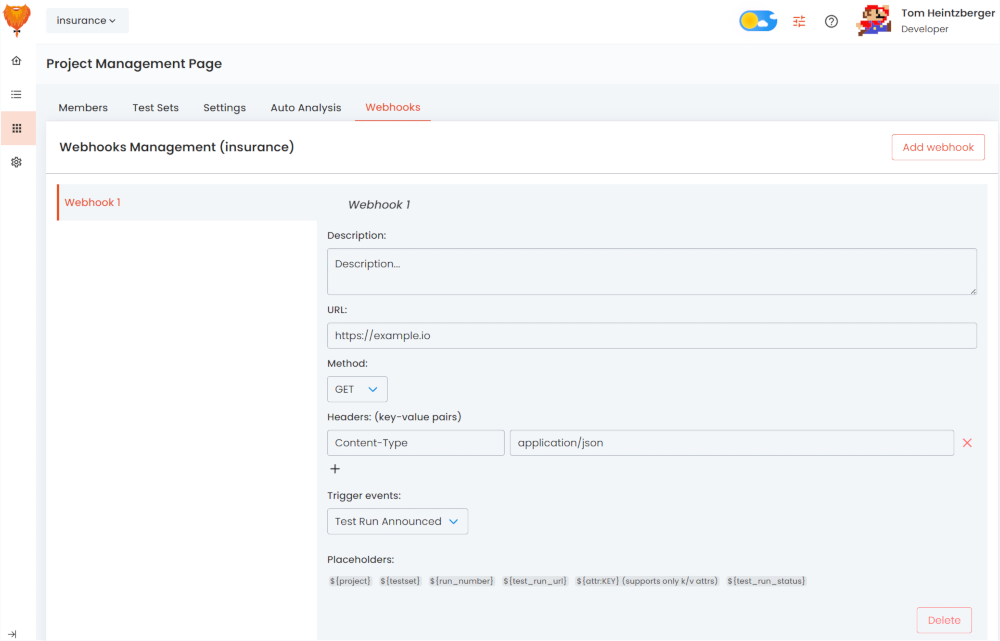
In the webhook configuration form, the following information can be configured:
- Webhook name: The name used to identify the webhook in the webhook configuration screen.
- Description: A description, used for your own reference.
- URL: The url to call when the configured event is triggered. This URL is expected to be a valid https URL.
- Method: The HTTP method to use.
- Headers: key-value pairs containing HTTP headers and their values. To add more headers, click the button.
- Body: The request body to send (in case of POST or PUT request) The body can contain the placeholders below.
- Trigger: The event that should trigger this webhook
Placeholders
To provide test-run specific information, placeholders for the following items are allowed in the URL and body:
| Placeholder | Value |
|---|---|
${project} | The project name |
${testset} | The test set name |
${run_number} | The sequence number of this run |
${test_run_url} | The url of the test run results in Orangebeard |
${attr:KEY} | The value of the attribute with the specified key (supports only key/value pair attributes) |
${test_run_status} | The status of the test run (Passed/Failed/In progress/Stopped) |